
Prerequisites
- Time Required: Less than 1 hour
- You will need to be a Salesforce Full System Admin (with access to View and Modify All Data) on one of the following editions:
- Salesforce: Enterprise, Performance, Unlimited, or Developer edition
- Salesforce: Professional Edition requires API Access
- This is not compatible with Salesforce1
- Sales Navigator Team or Sales Navigator Enterprise edition
- A Sales Navigator Administrator + Team Member Seat is required
Note: Admin only seats can configure the feature, but will not be able to verify full functionality for other roles (as they will not be able to see Sales Navigator information in app)
- JavaScript enabled browser is required
- Available for Leads, Contacts, Business Accounts, Person Accounts and Opportunities
- Now available for Person Account types. Embedded profiles (Widgets) will work for both Lightning and Classic versions of Salesforce. ) will work for both Lightning and Classic versions of Salesforce
- Note: CRM Sync & Activity Write-Back do not support Person Account types
- By installing this application, you are NOT enabling CRM Sync. To enable Sync, complete this installation and visit the Admin Settings within Sales Navigator
To review the Sales Navigator for Salesforce application in the Salesforce app exchange: Sales Navigator for Salesforce
Setting up Global Actions
Installation of Sales Navigator will create new Record Types for Tasks and assign custom defaults. If you do not have Task Record Types created, this can cause Record Types for Global Actions (e.g. New Event, Log a Call, New Task, etc.) to default to --Master-- which would remove existing Global Actions from the Activities list.
If after enablement you find that Global Actions are missing, please take the following steps:
1. Navigate to Setup Menu.
2. Next, click Build, Customize, Activities and Task Record Types.

3. Click the New Button.

4. Next, input the following information:
- Existing Record Type: Master
- Record Type Label: Generic Task (or whatever name you choose)
- Record Type Name: Generic Task (or whatever you choose)
- Description: <your choice>
- Active: <check>

5. Click Next button at the bottom of the page to advance to Step 2.
6. To Enable for your System Administrator Profile and for any other profiles who will be using the Task Record Type, choose Apply one layout to all profiles: Task Layout. Then click Save.

Now that you have created the Generic Task record type, add the New Task and Log a Call buttons back into SFDC.
1. Choose Setup, Build, Create, Global Actions, and Global Actions.

2. Click Edit next to Log a Call.

3. Using the drop-down next to Record Type, choose Generic Task, then Save.

4. For New Task, click Edit.
5. Using the drop-down for Record Type, choose Generic Task, then Save.

Note: If you previously created a custom or Generic Task for Record Types, this should not have any impact on you. Please ensure custom Task is set as the default post installation of Sales Navigator.
Install Sales Nav Salesforce App
1. Go to the install link for production or sandbox.
2. Choose a security level. We recommend choosing, Grant access to all users but you may wish to limit access to certain profiles and users for whom you have already provisioned Sales Navigator Team licenses. Click Install.
Note: Users will need a provisioned Sales Navigator Team or Enterprise account to use the application.

3. You will see one of two screens:
If you see an Installation Complete screen, move on to adding the application in Phase 2 (Configuration).

- If a Processing screen will appear, you will receive an email when the installation completes, at which point you can move on to Phase 2 (Configuration).
Remove the Ability for LinkedIn Tasks to be Created by Internal Salesforce Users
Note: For Enhanced Profile User Interface, please proceed to the next section.
1. Go to Setup.
2. In the Quick Find panel that appears on the left-hand side of your screen, type Profiles, and select Profiles located under Manage Users.

3. Click into your first Profile that is NOT System Admin.
4. Scroll to Record Type Settings. (Click into Object Settings if you have the Enhanced View).
5. Find the Tasks section and click the Edit link. (If you have the Enhanced View, select Tasks.)

6. Remove the LinkedIn Call, LinkedIn InMail, LinkedIn Message, PointDrive Created, and PointDrive Viewed Record Types from the selected Record Types by clicking the Remove button.
Note: If you have the enhanced view, remove the checkmarks under the Record Types column for those items.


7. Click Save.
8. Repeat for all Profiles (Important: do not repeat for the System Admin Profile.)
9. Proceed to Give users access to the LinkedIn Activities Report Folder section.
Give Users Access to the LinkedIn Activities Report Folder
Note: You will need to give access to the Unresolved LinkedIn Activities Folder to all users who will be responsible for the management of incoming LinkedIn Activities.
1. Navigate to your Reports tab.
2. In the Report Folders panel on the left-hand side of your screen find the LinkedIn Reports folder.
3. Hover over the LinkedIn Reports folder.
4. Click the push-pin icon that appears.

5. Select Share.


6. Click either Users, Roles or Roles and subordinates to share this folder with the proper users based on your organization's security model.
7. Search for the Users or Roles you want to share with and then click the Share button next to their name.
8. Under the Access column click the downward arrow and give the proper access. We recommend Viewer, but if you would like you users to be able to make modifications to this report, choose Editor.
9. Click the Done button.
10. Repeat for all Users or Roles that should have access.


Adding LinkedIn Member Profiles & Company Pages to Lead & Contact Page Layouts
- Lead page layouts add:
- LeadLinkedInMemberPage
- LeadLinkedInCompanyPage Visualforce pages to the desired page layouts
- Contact page layouts add:
- ContactLinkedInMemberPage
- ContactLinkedInCompanyPage Visualforce pages to the desired page layouts
1. For Lead page layout, go to Setup, Build, Customize, Leads, Page Layouts, and select Edit for the appropriate Lead on which you would like to see LinkedIn information. (For Contacts, Setup, Build, Customize, Page Layouts.)


2. Drag a new Section down into the page layout where you would like to see the LinkedIn member profile. We recommend creating this section at the top to ensure that the Lead information and LinkedIn profile are visible together.


3. As shown in the screenshot, enter the following in Section Properties and click OK.
- Section Name: LinkedIn Member Profile
- Detail Page: <checked>
- Edit Page: <unchecked>
- Layout: <1-Column>

4. Drag in another Section and place this just below the newly created LinkedIn Member Profile Section.
5. As shown in the screenshot below, enter the following in Section Properties and click OK.
- Section Name: LinkedIn Company Page
- Detail Page: <checked>
- Edit Page: <unchecked>
- Layout: <1-Column>

6. Move to Visualforce Pages by using the scroll bar.

7. Drag one of these pages into the new LinkedIn Member Profile section:
- LeadLinkedInMemberPage Visualforce page
- ContactLinkedInMemberPage Visualforce page

8. Click on the Properties icon at the top right of the Visualforce page component.

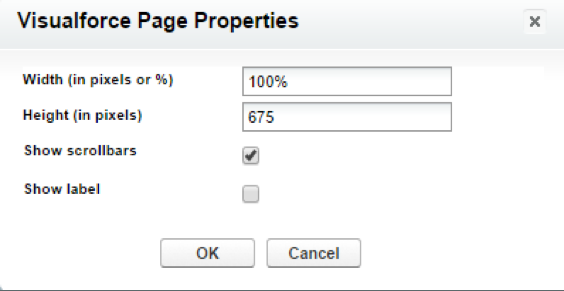
9. As shown in the screenshot, enter the following in Visualforce Page Properties and click OK.
- Width: 100%
- Height: 675
- Show scrollbars: <checked>
- Show label: <unchecked>
10. Drag one of these pages into the new LinkedIn Company Page section:
- LeadLinkedInCompanyPage Visualforce page
- ContactLinkedInCompanyPage Visualforce page
11. Click on the Properties icon at the top right of the Visualforce page component.
12. Enter the following in Visualforce Page Properties and click OK.
- Width: 100%
- Height: 675
- Show scrollbars: <checked>
- Show label: <unchecked>
Note: If you have Enterprise, Unlimited, Developer, or Sandbox edition and/or if you are installing the LinkedIn Sales Navigator for the first time, skip to Step 14.
Previously, Professional had limitations that require the additional step of making the app's custom field visible. This needs to be removed in the updated version of the LinkedIn Sales Navigator.
To remove this field, drag the LinkedIn Member Token field into the Lead Information section.
13. Additional Step for those upgrading from a previous version of the LinkedIn Sales Navigator for Salesforce application and who are using the Professional version of Salesforce.
14. Click Save at the top of the page to save changes to the Lead or Contact page layout(s).
15. Repeat steps 1-12 for all Lead and Contact page layouts on which you would like to see LinkedIn Member Profiles and LinkedIn Company Pages.
Adding LinkedIn Company Profiles to Account & Opportunity Page Layout
Account page layouts add AccountLinkedInCompanyPage Visualforce pages to the desired page layouts.
Opportunity page layouts add LeadLinkedInCompanyPage Visualforce page to the desired page layouts.
1. Go to Setup, Build, Customize, Accounts, Page Layouts, and select Edit for the appropriate Page Layout on which you would like to see LinkedIn Company Pages. (For Opportunity, go to Setup, Build, Customize, Opportunity, Page Layouts.)

2. Drag a new Section down into the layout where you would like to see the LinkedIn company profile. We recommend creating this section at the top to ensure that the account information and LinkedIn profile are visible together.

3. Enter the following in Section Properties and click OK.
- Section Name: LinkedIn Company Page
- Detail Page: <checked>
- Edit Page: <unchecked>
- Layout: <1-Column>

4. Drag one of these Visualforce pages into the newly created section:
- AccountLinkedInCompanyPage
- OpportunityLinkedInCompanyPage

5. Click on the Settings icon at the top right of the Visualforce page component.
6. Enter the following in Visualforce Page Properties and click OK.
- Width: 100%
- Height: 675
- Show scrollbars: <checked>
- Show label: <unchecked>

7. Click Save at the top of the page to save these changes.
8. Repeat steps 1-7 for Opportunity Page Layout(s) and any additional Page Layouts on which you would like to see LinkedIn Company Pages.
Optional
Add the Record Type to Your Activities Related Lists
1. Go to Setup, Build, Customize, Leads, Page Layouts.

2. Click the Edit link next your first page layout.
3. Scroll to the Related List Open Activities and click the wrench icon.

4. Move the Task/Event Record Type field from the list of Available Fields to the list of Selected Fields by clicking the arrows.


5. Under the Apply column information to other page layouts, click the Select All option, or choose just the page layouts relevant to this change.
6. Click the OK button.
7. Repeat steps 3-6 for the Activity History related list.

8. Repeat steps 1-7 for the Contact object.


Enabling Apex Class Access and Adding Visualforce Pages
If you did not grant access to all users in the installation step, you will need to enable Apex Class Access and add Visualforce pages to the specific profiles you would like to be able to access the application.
Note: Steps 1 – 3 are only needed for Dev Orgs. Please move to Step 4 if you are not using a Dev Org.
1. Go to Setup, Administer, Manage Users, Profiles and click on the profile for which you want to enable access to the app.

2. Hover over the Enabled Apex Class Access link. Select Edit.

3. Select the following items from the Available Apex Classes list, add it to the Enabled Apex Classes list, and select Save.
- LID.SalesNavigatorProfileController
- LID.SalesNavigatorProfileHelper

4. Hover over the Enabled Visualforce Page Access link. Select Edit.

5. Select the following pages from the Available Visualforce Pages list, add them to the Enabled Visualforce Pages list, and select Save.
LID.AccountLinkedInCompanyPage
LID.ContactLinkedInCompanyPage
LID.ContactLinkedInMemberPage
LID.LIContactMDPPage
LID.LIContactPublisherAction
LID.LeadLinkedInCompanyPage
LID.LeadLinkedInMemberPage
LID.LinkedInActivityPage
LID.OpportunityLinkedInCompanyPage

6. Repeat steps 1-5 for every profile you would like to be able to access the application.
Undo Lead Mapping for Previous Users of the LinkedIn Sales Navigator
In previous versions of the LinkedIn Sales Navigator if you wanted the member and company associations to propagate to accounts and contacts after lead conversion, you would need to map the corresponding lead fields. You no longer need to do this. If you are installing LinkedIn Sales Navigator for the first time, please skip forward.
To remove this lead mapping:
1. Go to Setup, Build, Customize, Leads, Fields, and scroll down to Lead Custom Fields and Relationships. Click Map Lead Fields.


2. Select the custom fields of LinkedIn Company Id and LinkedIn Member Token, and map them to None.

3. Click Save.
Congratulations!
You have finished installing and deploying the Sales Navigator for Salesforce application. Please ensure your team has been granted their LinkedIn Sales Navigator Team or Enterprise seats to view the application in Salesforce.
To view the Sales Navigator for Salesforce application, please go to a Lead, Contact, Opportunity, or Company Record in Salesforce. For your first time viewing the application, you will be asked to login to your LinkedIn profile. Your LinkedIn login will not be required after your initial login. Your experience will match the initial image at the beginning of the installation instructions.
Next Steps
We highly recommend you proceed to enabling the CRM Sync from within the Sales Navigator Admin settings. (Requires Sales Navigator Teams or Sales Navigator Enterprise.) You may find further information here.
Sync and activity write-back functionality is not supported with Person Account Types.
- Salesforce Professional Edition requires API Access Enabled in order for CRM Sync functionality to work. (An additional purchase may be required. Contact Salesforce for more details.)
CRM Sync for Sales Navigator:
Enablement requires less than 10 minutes.
Automatically imports Accounts, Leads, and Contacts into Sales Navigator associated with open Opportunities in your CRM.
Saves information you create in Sales Navigator directly in your CRM, including InMails, Messages, and Notes, with optional write-back.
For further information regarding CRM application, CRM sync, and CRM security and technical documentation, along with using your CRM for Seat Management in Sales Navigator, please visit here.
Additional Resources
More Info on Sales Navigator and to Contact Support: https://www.linkedin.com/help/sales-navigator
Technical Implementation and Security Whitepaper