Integrating your Salesforce account with LinkedIn Sales Navigator helps you to search for LinkedIn leads, contacts, accounts, opportunities, and access other LinkedIn features through your Salesforce CRM. Learn more about the full benefits of our CRM integration here.
You must complete the following prerequisites before proceeding with the installation.
You need full admin access on one of the following editions:
- Salesforce: Enterprise, Performance, Unlimited, or Developer edition
- Salesforce: Professional Edition requires API Access and Chatter enabled. This might require an additional fee, please contact Salesforce for more information.
To view and test all functionalities of Sales Navigator embedded profile in Salesforce, you need a:
- License for LinkedIn Sales Navigator Advanced Plus
- Sales Navigator Team Member seat or Administrator + Team Member access
Before installing Sales Navigator, you need to set up your domain in Salesforce (if not already enabled).
To set up your domain:
1. Navigate to your Salesforce homepage.
2. Click Setup and type My Domain in the Quick Find search box on the top left corner of the screen.

3. Select My Domain under Company Settings.
4. Type the name for your domain under Choose Your Domain Name section and click Check Availability.
5. If your domain is available, click Register Domain. Wait for the domain to be published.
Note: You’ll receive an email to your registered email id.
6. Click Log in to test your domain. Email from support@salesforce.com will be sent to your email. Click on the link in the email to log in and test your domain.
7. In the Navigate to this page pop-up window that appears, click Open.
8. When you’ve completed testing, return to the My Domain settings and click Deploy to Users.
9. In the pop-up box that appears, click OK. (*Domain setting can be edited later if desired.)

To install the LinkedIn Sales Navigator app:
1. Type LinkedIn Sales Navigator in the Quick Find search box.
Depending on your needs, you have two great choices for how to enable key CRM features:
- The Native Integration and
- The AppExchange Package
We recommend first installing the AppExchange Package, as it provides access to all features, including Data Validation and support for Salesforce Classic.
The following image shows the AppExchange Package installation landing page.

The following image shows the Native Integration installation landing page.

Note: If you need access to the Salesforce High Velocity Sales Integration, you can incrementally choose to activate the Native Integration. Please review a full feature comparison below:

2. To continue installing the AppExchange Package, select the LinkedIn Sales Navigator AppExchange Package tab and click Install.

3. In the pop-up window that appears, click Get it Now. You may be prompted to login to your AppExchange account for verification purposes.
4. Under Install in This org, click Install Here.
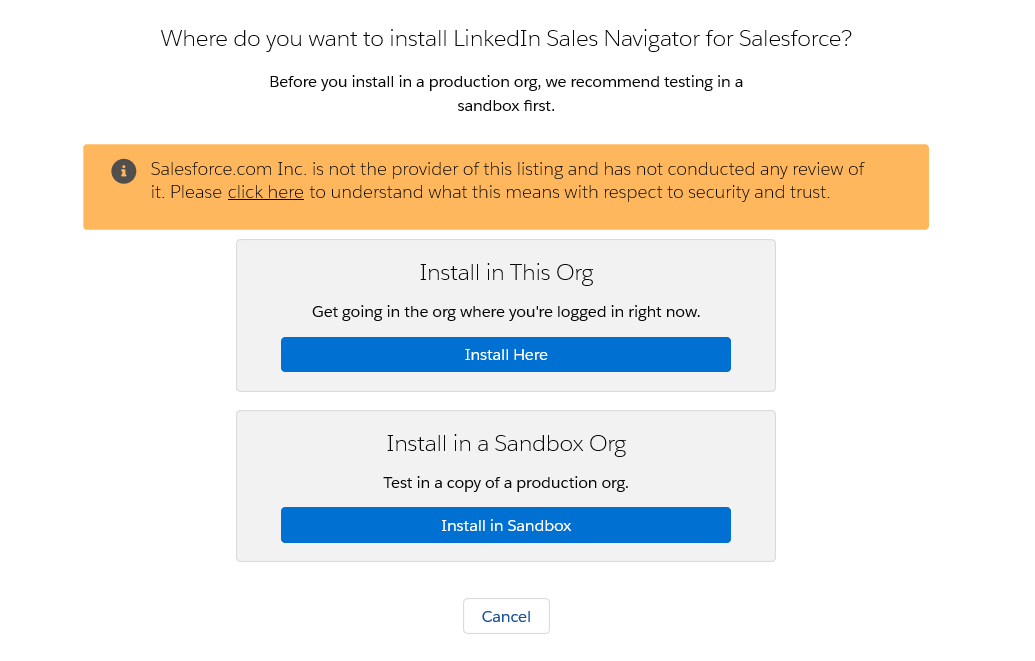
5. Review and agree to the terms and conditions and click Confirm and Install.
6. Determine the limited access to certain profiles and users:
- If you don’t wish to limit any users, we recommend selecting Install for All Users.
- If you wish to limit access to certain profiles and users for whom you have already provisioned Sales Navigator Advanced seats or licenses, select Install for Specific Profiles.
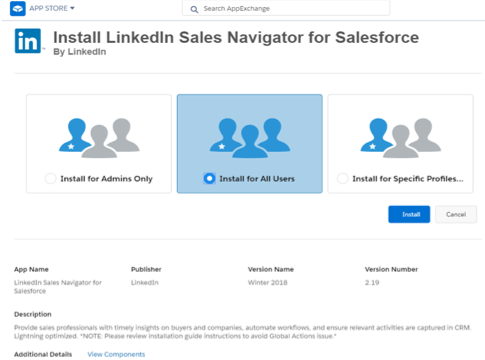
7. Click Install.
8. Complete one of the following steps based on your experience:
- If you see an Installation Complete screen, proceed to the next section.
- If a Processing screen appears, you’ll receive an email when the installation is completed post which you can proceed to the next section.
9. To incrementally enable the Native Integration (without access to Data Validation or SFDC Classic Embedded Profile components), simply toggle the Sales Navigator Integration button to On. Then follow the rest of the instructions on this page to configure Lightning Page Layouts and to enable the integration with High Velocity Sales.

1. Click the tile icon in the top left corner to access App Launcher.
2. Select LinkedIn Sales Navigator Assistant.

3. Follow the directions to configure Sales Navigator Components in the guide.
4. To enable Data Validation, toggle on Enable Enterprise Features from the top right corner and follow the on-screen directions.

4.1.2 Enable Apex Class Access and Add Visualforce Pages (Optional)
If you did not grant access to all users in the installation step, you’ll need to enable Apex Class Access and add Visualforce pages to the specific profiles you’d like to be able to access the application.
Important: To enable Apex Class Access and to add Visualforce pages, you'll need to add all packages that start with LID.
Note: Steps 1 – 3 are only needed for Dev Orgs. Please move to Step 4 if you are not using a Dev Org.
1. Go to Setup > Administer > Manage Users > Profiles and click the profile for which you want to enable access to the app.
2. Hover over the Enabled Apex Class Access link and click Edit.

3. From the Available Apex Classes list, select all that start with LID, add them to the Enabled Apex Classes list, and select Save.
4. Hover over the Enabled Visualforce Page Access link and click Edit.

5. From the Available Visualforce Pages list, select all that start with LID, add them to the Enabled Apex Classes list, and select Save.
6. Repeat steps 1-5 for every profile you would like to be able to access the application.
4.1.3 Assign permission sets
The LinkedIn Sales Navigator Standard User permission set must be assigned to any non-system admin that you want to provide access to Embedded Profiles (Advanced Plus only) or Embedded Experiences (Advanced Plus only). This is an extra compliance step that is required by Salesforce.
To assign permission sets to your users:
1. Navigate to Setup > User > Permission Sets.

2. Select the LinkedIn Sales Navigator Standard User permission set.

3. Click Manage Assignments.

4. Click Add assignment.

5. Select the users you want to assign the permission set to, and click Next.

6. Unless you want to set an expiration date for the access, click Assign.

You will see the status of the assignment in the final screen.
7. Click Done.

For more information, please refer to Salesforce documentation on Permission Sets or you could learn how to perform this task in bulk here.
Note: If you want a user who is not a CRM admin to be able to install or set up the app, you must assign the LinkedIn Sales Navigator Setup User permission using the same procedure described in this section.
4.1.4 Clone Permissions Sets
In Salesforce, the managed package permissions sets cannot be modified or updated. So if you need to make changes to any of the package permission sets, you will have to first clone the permission set, then update the values and finally assign a user to the permission set.
Following are the reasons for needing to clone and modify either of the two permission sets.
LinkedIn Sales Navigator Standard User:
Although the package requires this out-of-the-box permission set to be assigned to your users, there may be some instances where users still receive the error message in the component saying that they still have insufficient access. If this happens, the admin should clone this permission set and include the following field permissions as they are standard fields which are unable to be packaged. The reason for needing access to these fields is that the package uses them all as URL parameters for LinkedIn to ingest. The code runs in USER mode context, so the context user needs access to them. You will need to go to Object Settings in the cloned permission set in order to add these field level permissions for their respective object.
- Account object fields: Website, Industry, BillingAddress
- Lead object fields: ConvertedAccountId, Company, Website, Industry, Address
LinkedIn Sales Navigator Setup User:
It’s not possible to package System Permissions, so if any additional System Permissions are needed for your user who needs this permission set, you would need to clone it.
To clone permissions sets:
1. Navigate to Setup > User > Permission sets.
2. Click Clone displayed next to LinkedIn Sales Setup user permission set.

3. In the Clone: LinkedIn Sales Setup User screen, enter a new unique label and API name and click Save.

The cloned permission set is now displayed in the Permission sets screen.

Note: If you update the app package, you don't have to repeat this procedure.
To test the app:
1. Navigate to your Contacts homepage and click any desired contact record, after adding Sales Navigator embedded profile to these page layouts.
2. Test the changes you’ve made to the pages and confirm the embedded profile is added correctly.
3. Repeat Step 2 for Leads, Accounts, and Opportunities, if you’ve added the Sales Navigator embedded profile to those pages as well.
Notes:
- If you don’t see the changes you have made, switch to a different browser and open the same contact record again to validate changes.
- If changes are properly displayed on an alternate browser, please click here, to learn how to clear cookies and cache from your original browser to see changes.
- If that doesn’t resolve the issue, navigate back to setup, and validate that each layout was saved and activated.
- When viewing the App for the first time, you’ll be prompted to log into your LinkedIn profile. Your LinkedIn login won’t be required after your initial login. Your experience will match the initial images at the beginning.
- For further assistance, contact LinkedIn Sales Solutions support https://www.linkedin.com/help/sales-navigator
After completing the above steps, you can proceed to enabling the CRM Sync from within the Sales Navigator Admin settings. You can find further information here: Sales Navigator CRM Sync & Activity Writeback for Salesforce.
CRM Sync expands the integration and supports direct linking between the platforms, auto-saving of key Leads/Accounts, writing-back of Sales Navigator Actions into your CRM, and ensures you’re ready for future features that will require sync to function.
Additional references: