LinkedIn Sales Navigator helps you find the right prospects faster with customized, sales-specific insights like lead recommendations, company updates, and more. Click here to read an overview of LinkedIn Sales Navigator. One of the features of LinkedIn Sales Navigator is CRM Sync – integration your Salesforce CRM.
By connecting Salesforce with LinkedIn Sales Navigator via CRM Sync, you can access key CRM-powered integrations, including:
Auto-Save: Import and save CRM Leads, Contact, and Accounts in user’s Sales Navigator Lists.
Activity Writeback: Automatically log key Sales Navigator activities (i.e., InMails, Messages, Notes,) to CRM.
ROI Reporting: Demonstrate the value of Sales Navigator by requesting a report from your LinkedIn representative.
CRM Badges and Search Filters: See what Sales Navigator leads and accounts are matched to CRM entities, which contacts and leads are out-of-date in your CRM, and include or exclude matched leads and contacts in Sales Navigator searches.
CRM Opportunities in Account Lists: View CRM Opportunity information in Sales Navigator.
Champions List: See Past Customers at New Companies in user’s system-generated Lists.
Lead and Contact Creation: Create new CRM leads and contacts from Sales Navigator.
- Data Validation: Identify when CRM Contacts are out-of-date and no longer with their company using LinkedIn Data.
- Update Leads and Contacts: Allow leads and contacts to be updated directly from Sales Navigator to CRM with just a few clicks.
CRM Sync features are available only with Sales Navigator Advanced Plus edition.
Note: You can connect to a CRM Sandbox environment to initially test CRM Sync with Sales Navigator and/or test new CRM features before releasing to all your users. To know more, visit this help center article.
This guide will walk you through the process of enabling CRM Sync between Salesforce and LinkedIn Sales Navigator.
Enabling CRM Sync requires CRM Admin credentials for the integration user on one of the following editions:
* Salesforce: Enterprise, Performance, Unlimited, or Developer edition
* Salesforce: Professional Edition requires API Access (may require an additional fee, contact Salesforce support for more information)
- It is recommended to use an integration user rather than a personal or generic admin account since personal admin credentials can be revoked when that user leaves the company or their role changes. Using an Integration User can prevent accidental sync disconnection due to permission changes. If you choose not to use an Integration User on initial setup and desire to change after setup, you can always un-sync and then re-sync with the Integration User as the Salesforce Admin.
Note: Integration Users can enable CRM sync for all features using credentials with a minimum permission level of “View” (or Read-Only) on all objects and fields as listed in our technical documentation. Read this article to learn more about users and permissions.
- Sales Navigator Advanced Plus license
- Sales Navigator Team Member Administrator + Team Member license
Admin Only seats can configure the feature but will not be able to verify full functionality for the dashboard’s license holders.
If you are connecting your CRM with LinkedIn Sales Navigator for the first time, then you can use the step-by-step connection guide. This guide takes you through all the required and optional steps that will help you connect your CRM and configure the CRM settings and Activity Writeback. Until you have established a connection with the CRM successfully, you will see the new CRM connection step-by-step guide for both production and sandbox environment types.
The CRM connection guide takes you through the following main steps:
- Connecting the CRM
- Configuring CRM Sync
- Configuring ROI Reporting
- Providing instructions for unlocking advanced features such as embedded profiles and data validation.
The subsequent sections will take you through these steps sequentially.
Use the step-by-step guide to connect your CRM environment, production or sandbox, with LinkedIn Sales Navigator. While using the step-by-step guide, if you leave the process unfinished (without closing or exiting the screen), you can resume the connection process from where you left off. But, if you close the LinkedIn Sales Navigator window, or if you refresh the page, you'll have to restart the connection process from step 1.
Follow this procedure to connect the CRM for the first time.
1. Sign in to LinkedIn Sales Navigator.
2. Click Admin and then Admin Settings.
3. Within Admin Settings, go to CRM Settings.
4. Choose either Production or Sandbox.
If you are connecting to the CRM for the first time, you will see a write-up on the benefits of connecting your CRM to LinkedIn Sales Navigator.
5. Review this information to make sure you meet all the prerequisites and have necessary permissions and click Start.
The guided setup will take you through the connection process.
Note: You'll need read-only permissions on all objects to set up the CRM connection with Sales Navigator. This screen will also list the objects for which you might be missing permissions. As you update your permission levels, you can use the Check Permission Status option to refresh the screen and verify that you have the required permissions on all objects.
6. Choose Salesforce as the CRM that you would like to connect to and click Login.

If you're not using Salesforce as your CRM, click use a different CRM. This launches a pop-up from which you can select the CRM that you are using. This helps us gather feedback on other CRMs that are currently in use and can potentially be synchronized with LinkedIn Sales Navigator, since we only support Salesforce and Microsoft Dynamics currently.
7. Provide the admin user credentials.
On successful authentication, the page will display confirmation message that your CRM is connected, and that Sales Navigator has begun to ingest the CRM data. Data ingestion could take anywhere between a couple of days to a week to complete depending on the size of the CRM.
At this point, you have completed step 1 of connecting your CRM. You can now proceed to step 2 – Configuring CRM Sync Settings.
Note: If you run into authentication related issues at this point, check to see if you have installed and enabled the LinkedIn Sales Navigator OAuth App. Click here to view instructions on installing this App in your environment.
In the CRM connection step-by-step guide, after you have successfully completed connecting your CRM with Sales Navigator, you must proceed to the second step of configuring CRM Sync settings and Writeback.
Writeback allows you to save information you create in Sales Navigator, both from the desktop and mobile app, including InMails, messages, and notes, directly within your CRM. This will complete the two-way sync between Sales Navigator and CRM.
Note: Saving Calls in Sales Navigator is available for mobile app-initiated calls only.
Complete the following steps to configure CRM Sync Settings:
- In the CRM connection guide, after connecting your CRM, click Configure Settings.
- In the Configure Team Settings page, you can configure how your CRM interacts with Sales Navigator. You can toggle on the following options:
- Auto Save leads, contacts, and accounts - allows you to control which types of leads, contacts, and accounts Auto Save from your CRM. If you turn on this option, you can choose the types of leads, contacts and accounts that you want saved in your CRM.
Note: Options available for the “at which stage does your sales team consider an opportunity to enter your pipeline” field depend on your CRM settings and choosing Not Sure will still allow the feature to work and pull all open opportunities.
- Validate CRM Data: enable Data Validation. In addition to enabling this option here, you will need to install Sales Navigator for Salesforce App.
- Create leads: allows leads from Sales Navigator to be created into contacts in your CRM.
- Update leads: allows leads in CRM to be updated from Sales Navigator.
- Create contacts: allows contact creation from Sales Navigator.
- Update contacts: allows contacts in CRM to be updated from Sales Navigator.
- Log Messages and InMails: allows users to log messages and InMails exchanged with contacts in your CRM.
- Log Smart Links: allows users to create Smart Links and view related analytics.
- Log notes: allows users to log notes in the CRM.
- Log calls: allows users to log calls with contacts in the CRM.
CRM Sync features are available only with Sales Navigator Advanced Plus edition.

At this point, you have completed step 2 of configuring your CRM settings. You can now proceed to Step 3 - Setting up ROI Reporting.
In the CRM connection step-by-step guide, after you have successfully configuring CRM Sync setting, you must proceed to the third step of configuring ROI reporting.
- In the CRM connection guide, after configuring CRM Sync setting, click Set up ROI reporting.
- On the Configure ROI Reporting page, toggle on the Turn on ROI Reporting? option.
- Select an option from the dropdown list to indicate where you want to store the value of a won opportunity.
- Choose a currency to indicate total amount of influenced and sourced revenue.
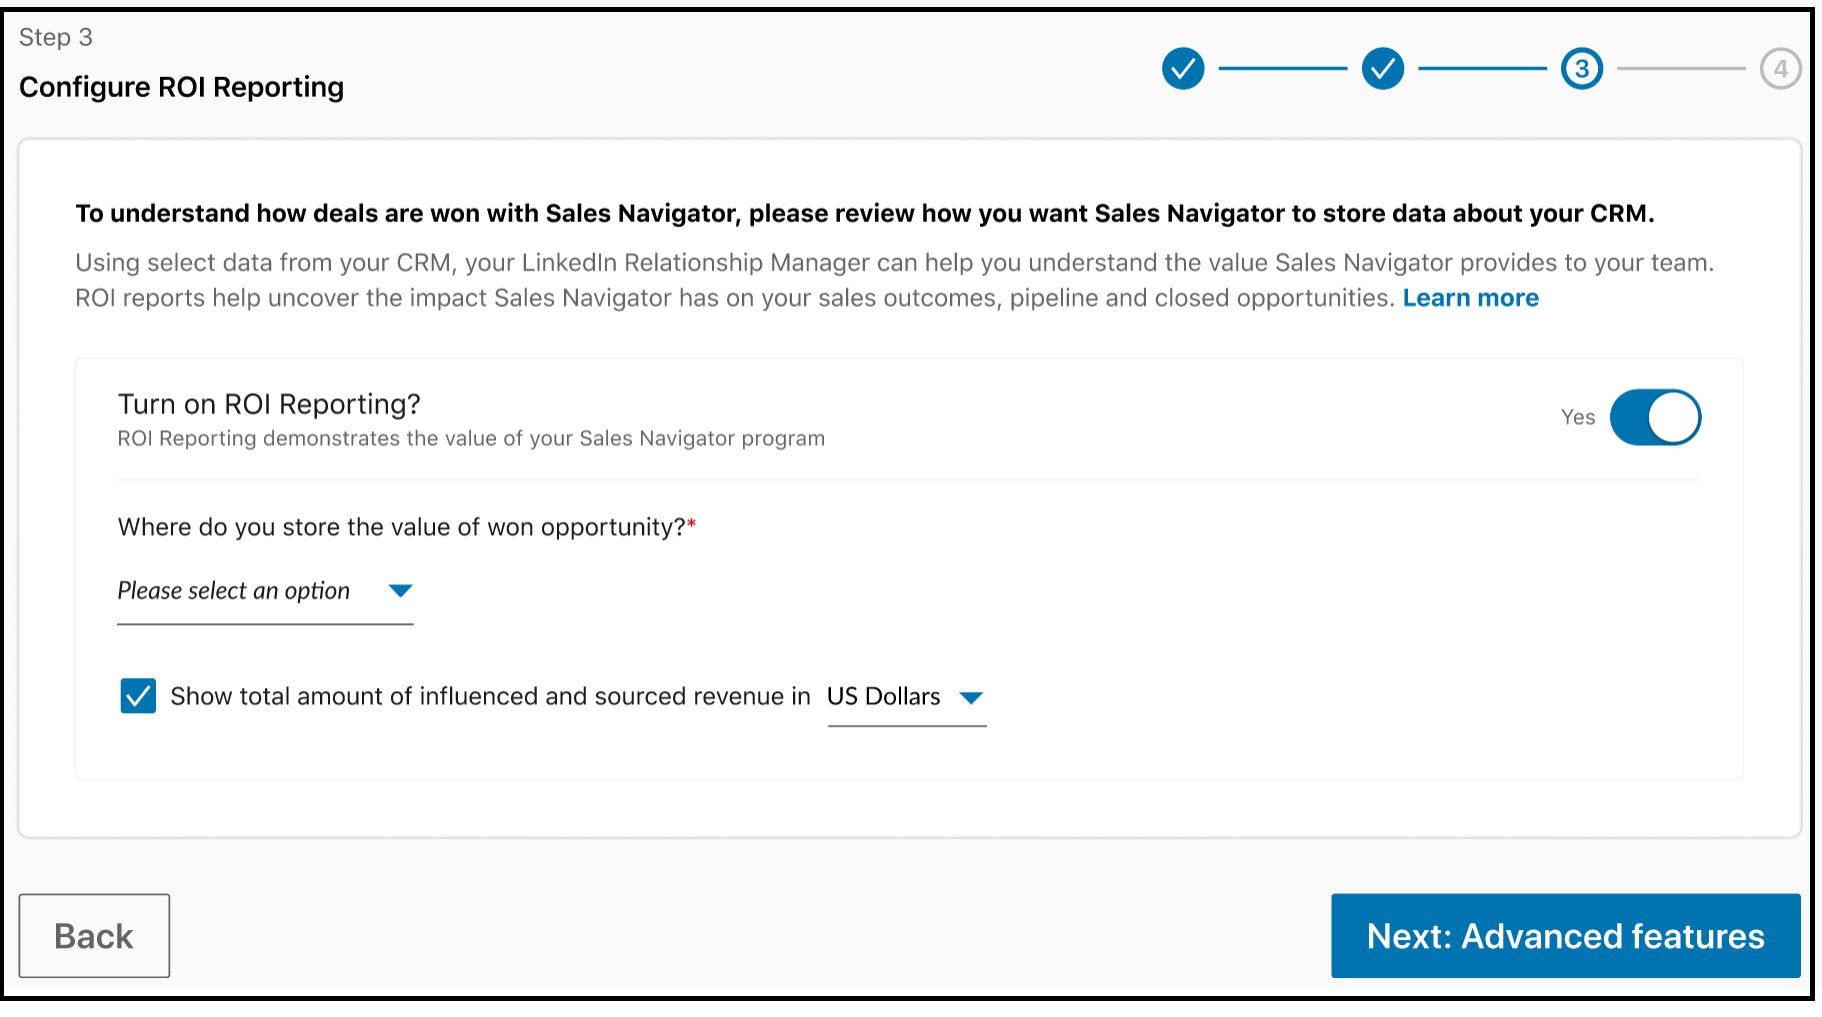
At this point, you have completed step 3 of the process of setting up your CRM. You can now proceed to Step 4 - Configuring Advanced features.
Learn more about ROI Reporting in LinkedIn Sales Navigator:
In the CRM connection step-by-step guide, after you have successfully configured ROI Reporting, you must proceed to the final step of configuring advanced features such as embedding profiles and enabling data validation.
- In the CRM connection guide, after configuring ROI reporting, click Next: Advanced features.
- To enable Embedded Profiles and fully enable Data Validation, you must install the Sales Navigator for Salesforce App. Follow the on-screen instructions to enable embedded profiles and data validation.
Click here to view instructions on installing the App for Salesforce Classic, and click here to view instructions for installing the App for Salesforce Lightning.

3. Click Finish.
At this point, you have completed all the steps in the guide to connect your CRM, and to configure CRM settings.
This section elaborates on permissions for other actions and tasks that you perform in LinkedIn Sales Navigator.
Lead Creation, Contact Creation, and Activity Writeback requires users to individually authenticate (user-auth) with the CRM. This is in addition to admin-level authentication.
CRM user-auth is enabled only if Admins have enabled CRM Sync on their contract.
- CRM user-auth is available for both production and sandbox environments.
You can connect to a CRM Sandbox environment to initially test CRM Sync with Sales Navigator and/or test new CRM features before releasing to all your users. To learn more, visit this help center article.
- The ability to update leads and contacts requires the user to have read and write permissions over the lead or contact. Sales Navigator respects CRM permissions, and if the user doesn't have the correct permissions to update the lead or contact in CRM, they won't be able to do so on Sales Navigator. To learn more, visit this help center article.
CRM Writeback and contact creation is available to all Sales Navigator end users only if the admin on their contract has enabled these features for them from the Admin Settings page.
- For Activity Writeback, a user is prompted to authenticate with the CRM in the following scenarios:
* While attempting to writeback an activity to the CRM and has not connected to the CRM before.
* While creating a contact and has not connected to the CRM before and
* While accessing the User Settings page to either connect or disconnect user-authentication for contact creation or activity writeback.
- All Sales Navigator users must authenticate with the CRM to use enable activity writeback.
Writeback functionality allows you to save InMails, Messages, Notes, Smart Links, and Calls that you create in Sales Navigator directly within your CRM. Writeback is compatible with both desktop and mobile applications and is enabled by default. All Sales Navigator users must now authenticate with the CRM to enable Activity Writeback. After a user’s identity is authenticated with the CRM, all Sales Navigator activities are written back to the CRM by default.
Notes:
- Saving Calls in Sales Navigator is available for mobile app-initiated calls only.
- You can perform Activity writeback on a lead/account page directly through the CRM.
Important Information for Admins:
- You no longer need LinkedIn Sales Navigator App to enable Activity Writeback. It is now enabled by default when you sync your CRM.
- To enable user authentication and API authentication, install LinkedIn Sales Navigator OAuth app. Click here to see instructions on installing the App.
- All users that will utilize Writeback will also need enough API access to write on the following objects: Tasks, Notes, and Calls.
- Retroactive writeback works on data only as far back as June 23rd, 2021. Any activity prior to this date is not available for writeback. Click here to learn more about activity writeback.
Writeback Behavior for End Users:
Log to CRM is enabled by default.
While creating a lead or a contact, if not connected to the CRM, you are promoted to login.
While performing writeback tasks, you will receive alerts on your authentication status.
Every 90 days, you will be prompted to connect to the CRM.
This section demonstrates how you will be prompted to authenticate and login to CRM while performing a writeback action. This section uses creating a contact and sending an InMail as sample procedures.
Creating a new contact:
- Sign in to LinkedIn Sales Navigator.
- Locate the lead that you would like to add as a contact to your CRM.
- Click …More and select Add contact to CRM from the dropdown that appears.

A pop-up determining your authentication status with the CRM will appear. If you have not logged into the CRM, you are prompted to login.
4. Enter your user credentials and click Submit.
Note: If you run into authentication related issues while creating a lead/contact or while sending an InMail message, check to see if you have installed and enabled the LinkedIn Sales Navigator OAuth App. Click here to view instructions on installing and enabling this app in your environment.
5. After authentication, fill out the Create CRM contact form fields and click Save.
Sending an InMail Message:
- Sign into LinkedIn Sales Navigator.
- From the top main menu bar, click Messaging.
- Click Write Message.
- Enter the name of your recipient and then move to typing the details of your message.
- Click Log to CRM.

If you have not logged into the CRM, then you are prompted to connect to your CRM account.
6. Click Connect to CRM.
7. Enter your user credentials and click Submit.
8. After you are logged into the CRM, you can click Send.
The InMail message you sent is automatically copied to your CRM account as well.
Note: If you run into authentication related issues while creating a lead/contact or sending an InMail message, check to see if you have installed and enabled the LinkedIn Sales Navigator OAuth App. Click here to view instructions on installing and enabling this App in your environment.
The following table describes the format in which Sales Navigator fields will appear in your CRM as part of Activity writeback:
| Field Name | Sales Navigator InMail | Sales Navigator Message Sent | Smart Links | Call Logging | Note on a Lead | Note on an account |
| Subject | InMail sent from Sales Navigator – [Subject lines created by Sales Navigator user] | Message sent from Sales Navigator | Smart Link View from Sales Navigator – [Smart Link Title] | Phone Call from Sales Navigator | Notes from Sales Navigator | Notes from Sales Navigator |
| Field Name | Sales Navigator Connection Request |
|---|---|
| Subject | Connection Request sent from Sales Navigator – [Personal Message created by Sales Navigator user] |
Admins will no longer see LinkedIn specific Tasks in their reports. They will, however, see the standard "Task", but the subject will be specific to the LinkedIn activity, as listed above in the table.
Sales Navigator Admins will need to migrate their CRM reporting (if used) from the use of Custom Task Record Types to standard Record Types. For questions on how to change these reports, please reach out to your CRM Support Team.
While performing writeback to the CRM, you can ensure that the data is written back to the right record in the CRM. Previously, you had manually correct the errors in the CRM. But now, you can correct records directly from Sales Navigator.
The steps in this procedure assume that you are matching a record while sending a message to a lead or contact.
1. Click the Log to CRM option.
You are prompted to confirm if the match identified is accurate or not.

2. If you think the details match, then click Yes. If you think this is an incorrect match, click No, Edit.
3. In the Match CRM record pop-up, scroll through the list of possible matches and click Match on the record that is accurate.

After you select the right record, a message on the screen confirming that the record has been edited is displayed.
4. Click Send to send your message. You will notice that the Log this conversation to CRM option is also enabled.

To see how Sales Navigator fields appear in your CRM, see section 6 in this guide.
Click here to view more information on CRM matching logic.
Below are frequently asked questions on Sales Navigator CRM sync:
How does the ownership and creation of information between Sales Navigator and Salesforce operate?
All information copied from Sales Navigator to Salesforce will be listed as an Activity in Salesforce. The License Holder is always the owner of any information shared between Sales Navigator and Salesforce. Also, the License Holder performing the action is shown as the creator for notes, tags, and InMails/messages.
How does reporting in Salesforce with writeback work?
If you are creating reports in Salesforce based on writeback, please keep in mind that the admin will be listed for all information. The owner (Sales Navigator seat holder) is the individual who created the action, and is shown as the creator.
Where can I find more information on CRM Sync, including the app, and the security or technical aspects of CRM Sync and writeback?
Please visit here: https://www.linkedin.com/help/sales-navigator/answer/82207